Anima 2D
Summary
1. Download Anima2D from Asset Store, click on its button in asset store again, choose import. (There'll be a pdf tutorial file once you import Anima2D. Or you can look at the file online here
2. Create sprites with separate layers in your 2d drawing software. Import them in Unity
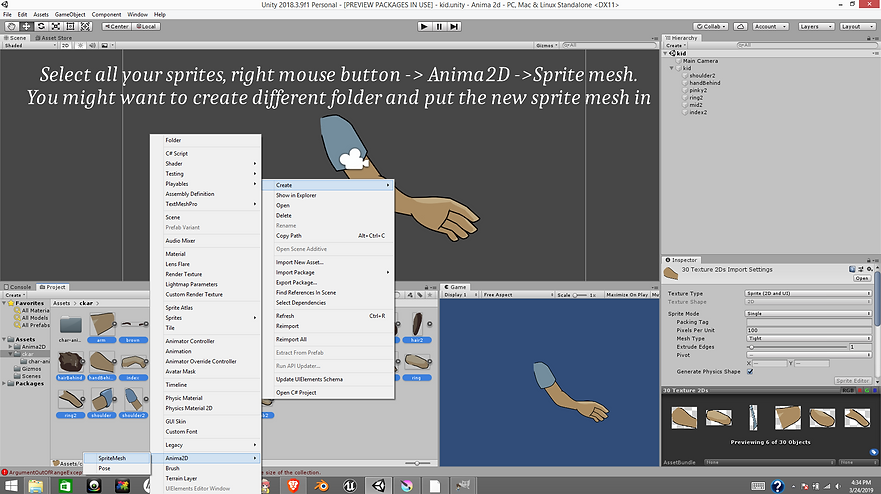
3. Select all of them in project folder, right click, choose Create -> Anima2D -> Sprite Mesh.
Click on that Sprite mesh. Click on the Edit Sprite Mesh button in the Inspector. (Double click the add vertex, drag mouse to move vertex. Don't forget to apply).
Put all Spite mesh in 1 empty object in the Hierarchy (name it Char) and select their layer (ex: Character's coat is in front of their shirt. Shirt layer: 1, Coat layer: 2).
4. After all sprites organize in the scene, create another empty obj in Hierarchy, parented to the 1 empty obj above (Char), right click on it, 2D obj -> Bone. Rename the bone base on its function like Pelvis, arm, ect
5. Open Edit Sprite Mesh panel again. Click the Sprite Mesh on the Scene or Hierarchy. Drag the bones for that sprite from Hierarchy to the Bones Panel in Sprite Mesh Instance Script (in Inspector). In the Edit Mesh Panel, click Bind. (tick on overlay to see weight)
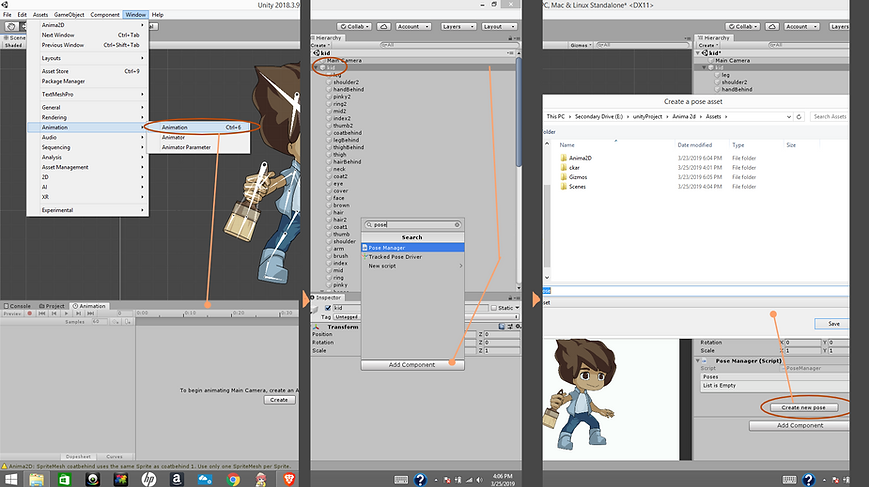
6. Add Pose manager if you want to change character pose.
Add Component -> Sprite Mesh Animation if you want to sprite wrap
(ex: smile mouth, sad mouth, laugh mouth) (you have to follow all the step above for each new sprite, from change to anima mesh to Bind bones. Remember the sprite had to be in the same position as the default one. After everything done, you can delete the new sprite from hierarchy and click on the default mouth, under Sprite Mesh Animation, put the new mesh from project panel to frame.)
7. Animation time:
Create Animator controller in asset file. (name it CharControl)
Click on the empty obj name Char, in the Inspector, click Add Component -> Animator. Put CharControl you just create from project panel in Controller
Go to Window-> animation -> Animation (ctrl+6). Drag it to Project panel (to optimize your space). Click Create to create new animation. Click on record button and start. (the record button add key frame to everything you do) (if you don't want to use it. In timeline, Right click -> Add key.
Detail
1. Download Anima2D

2. Export your asset/character in separate layers. Save as file .ora in every software that had layer function usually works. But they'll share the same screen size.


3. Select all the sprite, create Anima2d Sprite Mesh. (Put them in another group to be organize).
4. Click on 1 of the new sprite, open Edit Sprite mesh. Edit the vertex (or not) then click apply. If you had 2 bones or more, you need to add more vertex (add more Triangle) in order for the bones to work.


5.Drag the sprite in. Remember to create an empty obj that hold all the sprite. Don't forget Order in layer.

6.Set bones to the character, then bind the bone to the mesh and applied in Sprite Mesh Editor


7. Add Pose Manager (if need to change the pose).
Add Animation controller in Project Panel. Click on the empty obj that hold all the sprite mesh. Add Component -> Animator. Drag Animation Controller in project panel to Controller. Create animation.

Sprite wrap while render: Add new sprite in (ex: 6 new type of face). Redo the same steps from create Anima2d sprite mesh to bind bones. The new sprite when drag in scene have to share the same position of the old one. You can click on the Setting Button in the Inspector, choose Copy Component. Then go to the new one, paste component.

This is how my separate sprite look like


This is how the animation follow this method comes out.
Thank you very much for reading. I hope this tutorial helps. Wish you luck.